This is my fail safe method for making delicious pork belly, with juicy, melt-in-the-mouth meat and dreamy, crispy crackling. The alchemy that occurs during the slow, slow cooking process, is that the fat melts, basting the skin helping it pop and basting the meat and keeping it moist. By the end of the 4 hours, most of the fat will have melted, done it’s work, and ended up in the bottom of the pan, so, despite not being particularly healthy, it’s not quite as unhealthy as it might appear. But, you must cook pork belly low and slow. If you try and hurry the process, the meat won’t be tender, the crackling won’t puff, and you’ll end up consuming most of the fat.
When you buy the pork belly, buy it in a big slab, but don’t let the butcher score. It’s better to do it yourself, with greater care and precision.
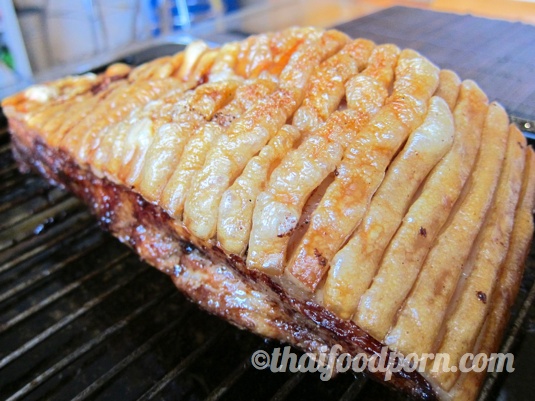
Once it’s cooked and rested for a few minutes, it can be sliced and added to noodle soup, or used in a spicy salad, in place of another meat or seafood.
Ingredients:
2kg slab of pork belly, with or without the bones (I like to use the bones for stock!)
2 teaspoons of salt
2 tablespoons of rice vinegar
Method:
1. Put the pork belly skin side up on a grill pan.
2. Sharpen a cleaver and use it to score the skin across the belly, no more than 1 cm apart, all the way down. Ideally you want to cut through the skin, into the fat layer, but not into the meat beneath. If you hit the meat a few times, don’t worry, but try and keep the cuts above it.
3. Boil a kettle full of water and carefully pour this all over the skin. This will cause the skin to contract and will soften the fat layer below. This step is crucial in helping the fat melt and the skin become crispy.

4. Leave the water in the bottom of the grill pan. Dry the skin with paper towels.
5. Mix the vinegar and salt in a bowl. To help the salt dissolve, I normally pop in in the microwave for 30 seconds.
6. Use a brush to paint the salt and vinegar all over the skin. Leave this on the rack, at room temperature, to cure for 1 – 2 hours.
7. When you come back to it, if the skin isn’t dry yet, use a hair drier to dry it off.
8. Preheat the over to 160°c (for convection, 175°c for conventional ovens)
9. Roast the belly into the middle of the oven, on the rack in the grill pan, for 3 hours 30 mins to 4 hours.
10. Check on it from time to time. to make sure the water hasn’t all dried out. The water in the pan will prevent any drippings from the pork from drying out and burning. Add more water periodically. I usually do this 3 times over the cooking period.
11. Once the time is up, the skin will be crispy, but probably won’t have puffed. The trick here to this is to lower the pan to the very bottom of the oven, turn off the oven and turn on the grill. You want it high, but not on the highest setting. Having it at the bottom means that the heat from the grill is a more consistent temperature all over the skin.
12. WARNING: if you turn you back for 30 seconds whilst puffing the skin, it can, and will, burn!! Watch it intently.
13. It should take just a few minutes for the skin to puff all over. There will be a point once it’s puffed and it looks like it’s darkening a little. This is when you should take it out because if you blink it can burn. I’ve been there an it isn’t funny, after you’ve been drooling for hours at the thought of all that lovely crackling!
14. Leave it to rest for at least 10 minutes before cutting into it.
15. No matter how good it tastes, don’t eat it too often!
Wow! Thank you Chris! I just read
The recipe Learned so much!! Can’t wait to try it. I love Thailand, I could live there easily. I will let you know how it turns out and will buy the street food cookbook from this page!